


Troubleshooting Classic Car Electrical Issues in Sag Harbor
Replacing an entire wiring harness is not always the right first step. When troubleshooting classic car electrical issues in Sag Harbor, first locate the fault: repair a localized problem if the surrounding wiring and insulation are sound, but consider replacement if insulation is crumbling or the system has been modified repeatedly. Battery and charging faults can also mimic wiring problems, so identify the cause before replacing components.
Aging wiring needs attention, but a methodical inspection can distinguish a repairable connection from a harness that has deteriorated throughout. This guide explains how to check the battery, inspect wiring and connections, and decide whether a minor repair or full harness replacement is appropriate. It also covers warning signs such as dim lights, recurring starting trouble, and visible damage, so you can understand what the evidence may indicate.
Table of Contents
1. Battery testing, charging, and replacement
If a classic car won’t start, note whether the starter clicks once, grinds, or stays silent. Inspect the battery connections and test the battery with a multimeter. For intermittent faults, repeat the checks when the symptom occurs, then trace the starter circuit from the battery terminals through the connections to the starter.
A digital multimeter is the primary tool for checking voltage, continuity, resistance, and voltage drops. A 12-volt automotive test light can help identify power at a circuit, but first establish whether the vehicle uses a 6- or 12-volt system. Keep the vehicle’s wiring diagram nearby to identify the correct circuit.
Start with the battery. Look for cracks, swelling, corrosion, loose terminals, or damaged cables. Test voltage at the posts, then compare readings during cranking and with the engine running. A weak reading during starting may point to a discharged or failing battery; dim lights or unexpected battery drain may indicate an alternator problem. The alternator powers essential vehicle systems while the engine runs.
To check the starter circuit, make sure the battery terminals and ground connections are secure, then test for voltage drop along the positive cable and ground path during cranking. A single click can indicate a starter or connection fault; silence can also result from a poor connection. Diagnose the circuit before replacing the starter.
Check a car battery after 3 years, and consider replacement by year 5, especially with frequent short trips or extreme climates. Regular jump-starts or a dashboard warning light are further reasons to test battery condition. Never jump-start a visibly damaged battery, and avoid touching both terminals with one tool, which can create a dangerous short circuit.
If a charged battery drains while the vehicle is off, use a multimeter to check for parasitic draw. A reading above 50 milliamps indicates a draw worth tracing through circuits and accessories. For replacement, secure the battery in its mounting before reconnecting cables. A trickle charger can help maintain battery health when a classic car remains idle for long periods.
2. Classic-car wiring harnesses and connections
Inspect the wiring harness with the engine off and the battery disconnected. Follow each visible run, looking for cracked insulation, exposed copper, melted sections, loose connectors, and previous repairs. A harness or switch may be 50 years old or older, so check behind accessible panels and near heat sources, where deterioration can be less obvious.
Pay close attention to grounds. Trace ground wires to their attachment points, then look for corrosion, looseness, or paint between the terminal and clean metal. A poor ground can interrupt current and create symptoms that resemble a failed component. Compare suspicious circuits with the vehicle’s original wiring diagram, then use a multimeter to test continuity and resistance. Use the meter reading as one diagnostic clue, and interpret it in the context of the circuit being tested.
Restored classic cars, especially those driven regularly, benefit from a yearly wiring inspection. Record unusual readings and note each wire’s route before disturbing a connection. For repairs, use wire that matches the original gauge. Solder connections and protect them with heat-shrink rather than relying on quick crimp connectors; an unsuitable repair can cause resistance, heat, or an intermittent fault.
For a jump-start, connect the red cable to positive and the black cable to negative. Confirm the terminal markings before attaching either clamp, and keep the clamps apart from each other and from metal parts. Never jump-start a damaged battery, as this can cause serious electrical damage.
Do Sag Harbor or New York rules affect classic-car inspections or electrical repairs? Inspection requirements are separate from the diagnostic steps described here; wiring troubleshooting starts with the vehicle’s condition and correct circuit diagram. If collision damage has disturbed wiring or connectors, collision-related repair work may be the relevant next step.
3. Classic-car electrical maintenance
The most common electrical faults include deteriorated wiring, poor connections, battery or charging problems, and ignition trouble. A classic car’s original system may be 6- or 12-volt, so identify its voltage before testing circuits or choosing equipment.
For circuit checks, use an automotive test lamp designed for 12-volt systems only when the vehicle’s system matches. A test lamp can show whether power reaches a point in the circuit, while a multimeter can measure continuity and resistance. Check the vehicle’s wiring diagram first; connecting a tool to the wrong circuit can produce misleading results or damage components.
Make maintenance systematic. During a yearly wiring review, inspect the harness, connectors, grounds, and visible insulation, particularly on a restored car driven regularly. Look for loose terminals, corrosion, exposed conductors, and signs of heat near switches or the engine. Record recurring symptoms, such as one lamp failing or an ignition fault under particular conditions, then trace the affected circuit instead of replacing unrelated parts.
For wiring repairs, match the replacement wire’s gauge to the original. A different gauge can change how the circuit carries current. Keep connections secure and protected, and compare repairs with the original diagram so future troubleshooting is clearer.
Ignition maintenance also depends on the system fitted. A correctly functioning points ignition system should provide 10,000 to 15,000 miles of service. For a classic car driven 1,000 miles annually, that system is described as relatively hassle-free, though regular inspection still helps reveal wear or inconsistent operation.
Changing from a 6-volt system to 12 volts can improve starting power, lighting brightness, and accessory compatibility. Treat conversion as a system decision, not a battery swap: check the vehicle’s components and wiring requirements together. Maintaining the original voltage may be preferable when preserving the existing configuration matters most.
4. Minor electrical repairs and full harness replacement
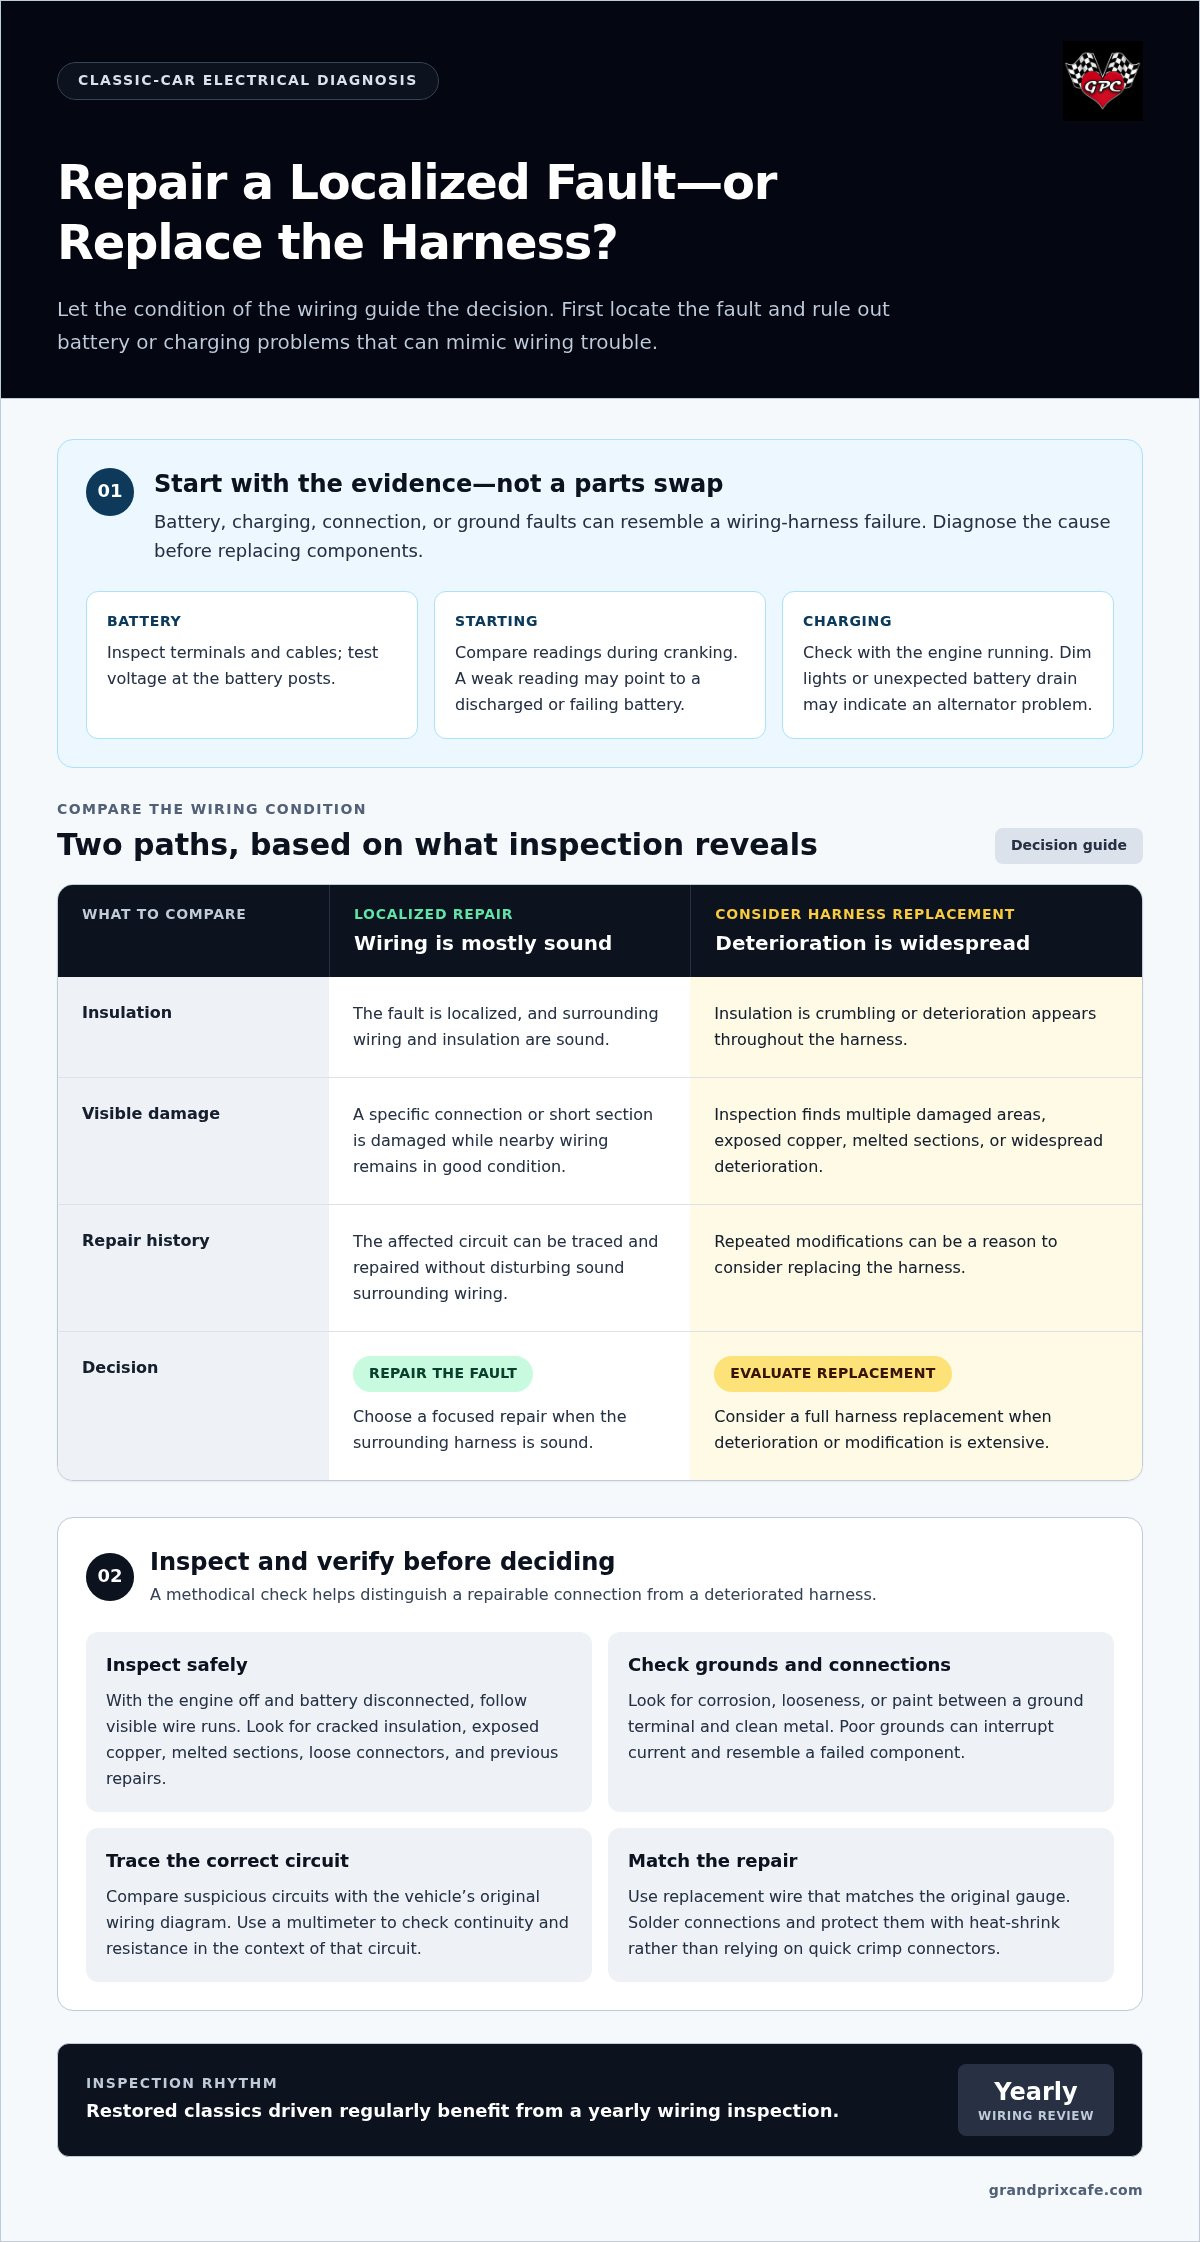
Choose repair or replacement based on damage across the harness, not just the failed component. A single loose connection or damaged wire may need only a localized repair if the nearby wiring and insulation remain sound. Crumbling insulation or repeated system modifications, however, may make broader replacement appropriate.
Start with the vehicle’s original wiring diagram. Compare the installed routing and connections with it, noting previous splices, added circuits, and altered switches. Test the affected circuit and inspect nearby wires. A fault limited to one accessible connection points toward a smaller repair; damage across several sections suggests a wider harness problem.
For a minor repair, isolate the affected circuit and document the wire’s original route before removing anything. Use replacement wire of the same gauge and make a secure, protected connection. Afterward, check the repaired circuit’s continuity and operation, then inspect nearby wiring for related deterioration. A repair that leaves brittle insulation or undocumented modifications in place may not address the underlying problem.
Consider full replacement when deterioration is widespread, insulation is crumbling in several areas, or repeated modifications make the wiring difficult to trace. The decision depends on the harness’s condition, access to affected sections, and how much original wiring remains intact. Preserving sound wiring can prevent unnecessary work, while patching extensive deterioration may leave further faults undiscovered.
How much does classic car electrical diagnosis and repair typically cost? The price depends on the case and is provided after a quote request. Key factors include the fault’s location, access, parts, and whether the work involves a localized repair or harness replacement.
If electrical damage followed a collision, discuss accident repair as a relevant next step.
Grand Prix Cafe: Car Service
Grand Prix Cafe provides Car Service for owners whose starting, charging, or wiring symptoms persist after initial checks. Recurring electrical faults may need closer assessment to distinguish a battery or alternator concern from damaged wiring or a failing connection. Notes on when the symptom occurs, which circuits are affected, and any recent repairs can help clarify the issue.
Use car service when testing points to a fault you can’t isolate, wiring damage extends beyond one connection, or repairs call for a broader mechanical assessment. Careful diagnosis helps determine whether the next step is a focused repair or further work on the vehicle’s electrical system.
Contact Grand Prix Cafe or visit grandprixcafe.com to discuss your vehicle.
Make the Next Decision With Care
Electrical work can inform your plans for the next chapter of ownership. Keep a clear record of symptoms, completed repairs, and unresolved concerns. That history can support decisions about maintaining, restoring, or selling the vehicle without treating every fault as a reason for major replacement.
When troubleshooting classic car electrical issues in Sag Harbor, consider the vehicle’s condition and how you plan to use it. Grand Prix Cafe provides Car Service for ongoing vehicle needs, along with Classic Car Sales and Vehicle Consignment Services for owners considering a change. Each serves a different purpose: continued use, a new acquisition, or a sale.
Bring your questions and vehicle details into the next conversation. Contact Grand Prix Cafe to discuss the appropriate next step, and move forward with a considered plan for your classic car.
Frequently Asked Questions
Restoring Antique Car Wiring: Replace or Repair?
Repair an isolated fault when testing shows the surrounding circuit remains serviceable; consider replacement when deterioration affects more of the harness. One failed lighting branch, for example, may be repairable, while unrelated faults across several circuits suggest a wider problem. Before deciding, document existing routing and compare the installed wiring with the car’s original diagram. This helps preserve correct connections and avoid introducing new faults during restoration.
What does a failing starter sound like?
A failing starter may click once, grind, or remain silent when you turn the key. Note whether the engine cranks, whether the sound changes between attempts, and whether dashboard lights dim. These observations can help distinguish a starter symptom from another starting-circuit issue. Avoid repeated attempts if grinding continues, as the sound warrants inspection of the starter and its engagement.
How do you test a classic car battery, alternator, starter, and voltage regulator?
Use a multimeter to compare battery condition, circuit continuity, resistance, and voltage drops during starting and operation. Check whether the alternator supports vehicle systems while the engine runs, then assess the starter circuit during cranking. For the voltage regulator, compare its operation with the vehicle’s original service specifications and wiring diagram. Identify whether the car uses a 6- or 12-volt system before selecting test settings or interpreting readings.
How do you troubleshoot classic car wiring, grounds, fuses, and connectors?
When troubleshooting classic car electrical issues in Sag Harbor, start with the symptom. If one lamp fails, trace its circuit rather than checking unrelated systems first. Check the fuse, connector, ground point, and wiring against the diagram. A fuse that blows again after replacement indicates a continuing circuit fault, not a lasting fix. Record which components stop working together; shared failures can point to a common connection or power feed.
When should a classic car's wiring harness be repaired or replaced?
Choose a localized repair when the fault is limited and nearby wiring remains intact. Consider harness replacement when damage is widespread or accumulated changes make the original routing difficult to trace. Before work begins, document branches, connectors, and non-original additions. This record can help preserve the vehicle’s configuration and simplify later service, especially when restoration involves multiple electrical circuits.
What are the safety risks when working on vintage car electrical systems?
A tool bridging both battery terminals can create a dangerous short circuit, so keep tools clear of both terminals. Never jump-start a damaged battery, as this can cause serious electrical damage. Identify the car’s system voltage before testing, since equipment intended for a different system may give misleading results or harm components. Stop if insulation is damaged or a connection heats during testing, and have the fault assessed before driving further.
Comments